|
|
|
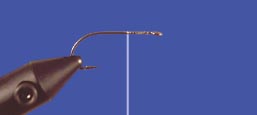
Step 1
:
Place the hook into the jaws of the vise. Cover the front 1/3 of the hook with the clear mono tying thread.
|
Recently
I had the opportunity to chase Coho for the first time in the protected
waters of Clayquot sound. While I have pursued Coho on the fly for
years my experience had been limited to the coastal estuaries, rivers
and sloughs in and around the lower mainland. Although fishing could
have been better I thoroughly enjoyed myself and I can't wait to
get back over to Tofino and the fabulous folks at
Weigh West Resort . Weigh West offers packages that cater to
saltwater fly fishers, I can't say enough about their setup and
recommend their services to anyone. During the time I spent in
Tofino I was amazed that the skills I had developed fishing
British Columbia's rivers and lakes blended perfectly with the requirements
needed on the salt. The long casts, double hauling and various mending
techniques all came into play as I plied the various tidal flows,
eddies and kelp beds. During either an ebbing or flooding tide the
current flowed so fast through the narrows that I swore I was fishing
on a river. Only the swaying fronds of kelp reminded me of where
I was.
|
|
|
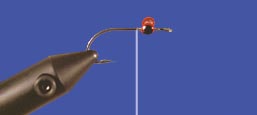
Step 2 :
Using figure eight wraps secure a set of dumbbell eyes onto
the shank. The eyes should be situated no closer than two
eye widths from the hook eye. If possible I prefer the 1/3
point on the hook. Time permitting epoxy the eyes so they
don't twist and move. Tying a group of eyed hooks at this
point is a good idea when tying a number of Clousers. If time
is an issue, which it usually is, a couple of dabs of Crazy
Glue works too.
|
Another
attraction to this new venture was the variety of fly patterns creative
tyers such as Shawn and Lise Bennett of Moonlight Flies have developed
specifically for open water Coho. Compared to the tiny patterns
needed for our interior lake fishing it was fun just tying on larger
hooks. Preparing for this trip I became a sponge for fly patterns
and presentation techniques. Nestled in my fly box where various
colored streamers, Shim Hogan's Sardina, and a number of Shawn and
Lise's designs including their Catface Streamer and Flashy Glow.
But for this particular trip I had my best success on a fly pattern
originally designed for Smallmouth Bass on Pennsylvania's Susquehanna
River, Bob Clouser's universal minnow. No matter what species an
angler is after, if they eat baitfish then there is a Clouser to
suit them.
|
|
|
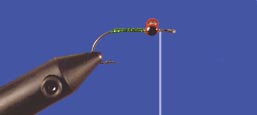
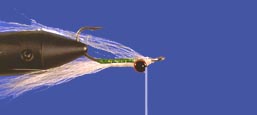
Step 3 :
With the eyes in place tie in a length of bright green Frostbite
directly behind the eyes. Wind the Frostbite down the shank
and back up to the original tie in point. Tie of the Frostbite
and trim the excess.
|
The
Clouser Minnow has evolved into a tying style, by varying the color
and size of the pattern any baitfish can be imitated. Looking at
a Clouser one wonders how a fish can mistake this for food. Compared
to the real thing this pattern looks like a fleeting glimpse and
that is exactly the magic of this pattern. As I peered in depths
around Tofino, I was overwhelmed by the sheer numbers of needlefish,
pilchard and anchovy but unless I managed to get a hold of one,
all I saw were flashes and vague images, exactly the same view the
marauding Coho see. Using a slow to moderate strip retrieve this
pattern darts and dives continuously, takes are nothing short of
ravenous. Another bonus for this pattern was its magic on other
species. When Coho became tight lipped we worked around the numerous
rocks and kelp beds for Black Rockfish. These little bulldogs hammered
our Clousers with a vengeance, their strength was surprising as
they easily bent an 8 or 9 weight double.
|
|
|
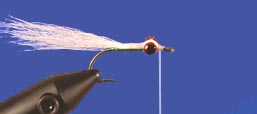
Step 4 :
Prepare a sparse clump of white bucktail, we don't
want an overdressed bulky fly. Don't stack the hair either
even the tips by hand, we don't want any paintbrush looking
flies either! Measure the bucktail so it is at least twice
the shank length. Trim the butts on an angle and secure them
in place in front of the eyes. Carry the tying thread through
the eyes and bind the bucktail down directly behind the eyes.
Using open wraps tie the bucktail down the shank to the tip
of the hook point.
|
This
particular variation of the Clouser comes via Peter Morrison. Peter
is a well-known sales rep in British Columbia marketing products
such as Sage and Scientific Angler. But Peter is an accomplished
saltwater fly fisher as well, with years of experience taking
Coho on the cast fly. Peter provided valuable insight as I prepared
for my trip. Peter searches out tide rips, horizontal and vertical
eddies, as these are natural gathering points for baitfish, and
were the baitfish go so go their predators. By either anchoring
or tying off to kelp Peter uses a type 4 or 5 fasting sinking line
to swing his pattern through the current. Sinking his fly down to
the Coho through a series of stack mends Peter lets his pattern
hover and hold down below before beginning a slow retrieve back
to the boat.
The
Clouser is a simple efficient tie. The only trick is remembering
to put the white wing on top. At first glance this looks upside
down but the dumbbell eyes cause the fly to ride hook point up.
The underwing ends up on top when the fly is on the job. Although
Peter prefers a body of green Frostbite for his West Coast version
many tyers use no body at all, the choice comes down to the individual.
As for the eyes some prefer yellow with black pupils others such
as Peter believe in red with black pupils. Peter's theory that when
injured by an attacking Coho the gills and eyes of a baitfish are
the first to bleed, again the choice is up to the tyer.
|
|
|
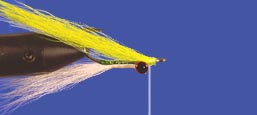
Step 5 :
With the tying thread back in front of the eyes invert the
fly by either turning the hook upside down or rotating the
vise. Tie in a few strands of matching or Pearlescent Krytsal
Flash or Flashabou. For this example I used some of Tiewell's
UV Pearl Flashabo as it gives the fly a little inner glow.
Remember, keep things sparse.
|
The
Clouser Minnow has become one of the most versatile baitfish patterns
in the fly fisher's arsenal and has quickly become a personal favorite.
By altering the colors, materials, eyes and overall length and look
of the pattern I can imitate everything from Needlefish to Sculpins.
Good friend Brian Chan is
currently experimenting with a design specific to Red Sided Shiners.
I have no doubt he will be successful.
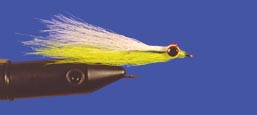
Clouser Minnow (Peter Morrison's Version)
-
Hook: Tiemco 811S or Equivalent #4-#2
-
Thread: Clear Mono
-
Body: Bright Green Frostbite
-
Eyes: Painted Dumbell Eyes (Red)
-
Wing: White Bucktail
-
Bottom Wing: Chartreuse Bucktail mixed with a few Of Flashabou
or Krystal Flash
|
 |
|
Step 6 :
Prepare a second clump of bucktail in the same manner as
the first. This second clump should be twice the thickness
of the original clump. Again not to harp on a single point
but sparse is key, as the materials must be allowed to flow
and not end up competing with each other. Stagger cut the
bucktail and secure it in place in front of the eyes. Adjust
the thread tension so the hair flows back along the fly.
|
Step 7 :
Build up a neat tapered head whip finish and apply head
cement. Once the initial cementing is done I like to apply
a finish coat of Angler's Choice Soft Body, thin formulation
or epoxy.
|
|


