|
|
|
List of BC Adventure Advertisers Site Info
Advertise With UsAwards About Us Contact Us  Kayak with Killer Whales Free Vacation Guides
BC Vacation GuidesCoastal Vacations Thompson Okanagan EcoTourism Fishing Vacations Guest Ranch Guide Romantic Getaways Wilderness Vacations Winter Vacations The Rockies Guide 
Coastal Spirits Expeditions Login |
Throughout the open water season chironomids are the single most important food source for trout in productive stillwaters. From personal study and observation chironomid pupa make up to 50% of the trout's diet during the spring season. With over 2500 species in western North America chironomids offer a rich, readily available food source. Although the heaviest hatches occur in the months immediately following ice off and turn over chironomids are a an all season food source that trout become accustomed to seeing and feeding upon. Like a bowl of potato chips or other snack at a party it seems that trout just can't resist chironomid pupa. It takes a number of pupae to make up a meal, so our odds of catching a trout increase accordingly. I have seen selective pupa feeding of epic proportions. Trout become so stuffed it seems inconceivable they could swallow anymore.
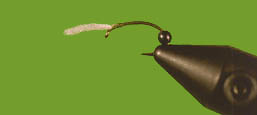
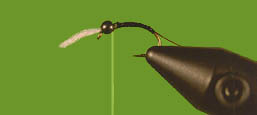
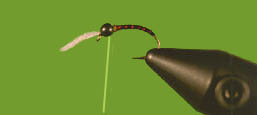
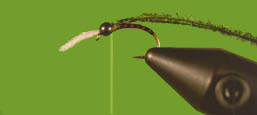
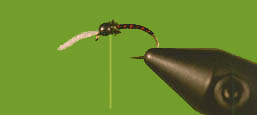
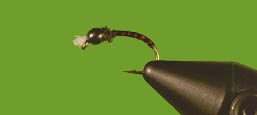
Chironomid pupae have a number of key features for the fly fisher and tyer to be aware off. Beginning at the head all chironomid pupa have distinct white gills, larger species also possess fine posterior gills. The anorexic body of the pupa demands that successful patterns should be neat, slender and tapered ever so slightly, there is no room for fat. Perhaps the most critical feature is the reflective shine of the rising pupa. Ascending pupa use trapped air and gases they absorb from the surrounding water to help with the emgerence process, both through the water column and at the surface. This air and gas shines so bright that it often obscures the true color of the pupa. But trout are not color blind and at times become focused upon a particular size or color. Black is probably the most common pupal color but others colors of note include brown, olive, and various shades of green. Any chironomid pattern that is skinny, bright and has distinctive white gills should be successful. Like many of my chironomid pupa patterns the Black Sally was designed with these key features in mind.
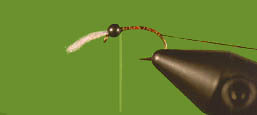
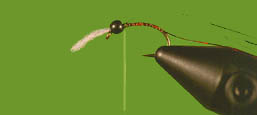
I weight 90% of my pupal patterns and I make good use of metal beads as they add flash and take no time to place on the hook, a nice alternative to using lead wire substitute. My favorite sizes are 1/8 of an inch for patterns size 10 or larger, for sizes 12 or smaller I prefer 3/32 of an inch to keep things proportional. Depending upon the overall color scheme of the pattern I use black, gold and copper beads. Other successful bead alternatives include glass beads for added translucence and reduced weight or tungsten to plummet the pattern to the bottom. When fishing pupal patterns in 15 feet or more tungsten is tough to beat. To imitate the reflective body of the ascending pupa I favor Super Floss, Flashabou, Frostbite or Krystal Flash. Color is usually the deciding factor as each of these materials offers a different color range. To imitate the body segments I rib my pupal patterns using fine wire, Flashabou or Mylar, again color typically dictates my choice. Holographic materials have become a quick favorite of mine, especially silver and red. On the Black Sally the red Holographic Flashabou does a superb job imitating the red hemoglobin banding common to so many pupa. For added flash and durability I cover the bodies of my pupa patterns with two thin coats of either Sally Hansen's Hard as Nails nail polish or Angler's Choice Soft Body. Frostbite, Krystal Flash and Flashabou suffer in the toughness department, especially after being ravaged by a number of fish. The Sally in the Black Sally is in reference to the finishing coats of bright nail polish I finish each fly with. The basis of the Frostbite Bloodworm is simplicity. Like the larva itself, this thought pattern does not inspire angler confidence. Using other spartan patterns as a guide I devised a pattern consisting of a small V tail, bright red body and fine wire rib, only recently did the tail become a regular feature, imitating the distinct posterior pro-legs of the larva. My original concept consisted of a body of Frostbite counter wound with fine copper or silver wire. The anorexic nature of this pattern helps improve its sink rate too. To accelerate the descent even further, try a small tungsten bead or underbody of fine wire. When forming the wire under body, wind the wire down hook shank making sure to leave enough to form the rib. Do not counter wind the rib as this serves to unravel the underbody, instead wind the rib using the traditional over the top technique. My favorite sizes range from #10 through #16, with a size twelve has been my most consistent producer. Mix and match various colors of Frostbite to create the different banded effects that are common to many species. My favorites include red, maroon, olive and green.
A floating line coupled with a leader three to four feet longer than the depth of water I am fishing performs the lion's share of my chironomid fishing. Depending upon conditions, and whether or not my kids are in the boat, I fish both with and without strike indicators. Strike indicators are an excellent method to accurately control the depth of any presentation, as depth in most instances is more important than size or color of the pattern. But given the choice I still enjoy the challenge of fishing without an indicator. Granted the takes are less obvious and balancing the sink rate of the fly with the speed of the presentation makes going "naked" a bit more difficult but there is just something about developing a sixth sense detecting the strike that I enjoy. Whatever method, keep the leader diameter skinny, so the pattern sinks quickly to the proper depth, remember thick mono sinks slower than the skinny stuff. The Black Sally
|
 Follow Us On Facebook Articles Fishing VancouverPhils Flybox
Bill's Big RedDunc's Floating Carey Frostbite Bloodworm Glenn's Leech Marabou Prawn Pearl Shrimp Silly Creek Saviour The Black Sally The Clouser Minnow The Collaborator The Damsel Leech Thing The Epoxy Minnow The Popsicle Stillwater Fly Tactics
Chironomid TipsDamsels Leeches Looking For Clues Scuds Writers:
Peter Caverhill Brian Chan Fred & Ann Curtis Ian Forbes Geoff Hobson Gordon Honey Steve Kaye Fred's Custom Tackle Ron Newman D. C. Reid Philip Rowley Barry Thornton |
|||||||||||||||||
|
|||||||||||||||||||

